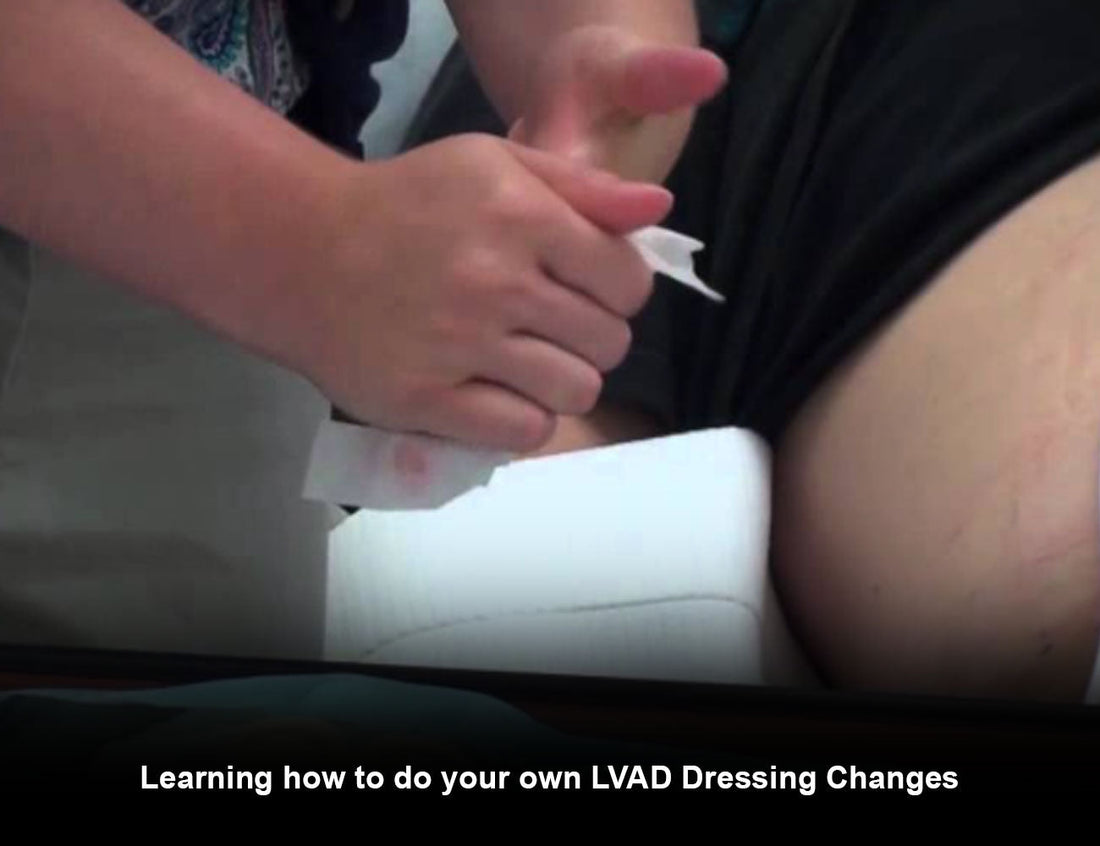
Learning how to do your own LVAD Dressing Changes
If you have received an LVAD while waiting for your transplant, or as a permanent treatment, you may need to learn some aftercare techniques to protect your driveline site and prevent any complications like infection, skin irritation, trauma to the driveline, and abscess. For you to live with independence and a good quality of life, you have to follow your doctor’s instructions on how you can change the LVAD dressing on your own.
Taking care of your Left Ventricular Assistive Device (LVAD) may seem overwhelming at first, but with time, routine, and proper instructions, you can have the confidence to do it without having a second thought. Doing LVAD dressing changes will just become a part of your daily routine, and you may be able to do it without any mistakes.
The good news is, once you understand the importance of doing it right and start following your doctor’s instructions exactly, changing an LVAD dressing will become a simple and regular process for you. Here we have a step-by-step guide to help you do it right every single time.

Understand LVAD Components:
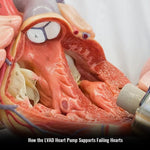
Before starting the guide on LVAD dressing changes, it is important for you to understand its components to make sure that the site stays clean. Here is the LVAD device explained. The LVAD device has both internal components, which are implanted in your heart, and external components, which remain outside the body. One of the external components is a driveline that exits the body, usually from your abdominal area. It is the driveline that connects the LVAD pump inside the heart to the controller outside your body.
Why the Driveline Dressing Matters? One of the most important responsibilities you have is to keep the driveline exit site clean and infection-free, because the driveline site is the area where it comes through the skin, and an infection can spread from this direct path to the body. Because this site leads directly to internal components, keeping it germ-free is crucial to prevent serious infections. You have to protect this area by doing a dressing with a gauze that is disinfected or germ-free. This dressing is specifically made for such purposes.
Another important component that you need to be protected is the LVAD controller, which manages the whole functioning of the pump inside. Although these components are not involved in the dressing changing procedure, you need to keep them secure to avoid any pulling on the driveline. Just like you use an LVAD shirt, you need LVAD belts or bags that are strapped to the body. These products are available in high-quality at LVADGear, with high durability and comfort. LVAD apparel helps prevent unnecessary movements that can cause irritation and limited movement. You must understand these parts to make LVAD dressing changing safer and smoother.

Things you need while doing your LVAD Dressing:
Before starting, make sure you have everything arranged on a clean, dry surface:
- Sterile dressing change kit
- Antibacterial swabs or cleaning solution
- Sterile gloves
- Mask
- Transparent dressing
- Gauze and tape
- Trash bag for disposal
Important Note: Before using any of the above material, always check expiration dates and sealed packaging. It is important to keep things germ-free.
Step-by-Step Guide for LVAD Dressing Change:
Here is a complete guide breaking down in steps for you to understand how to do your own LVAD dressing changes:
- Preparation for the procedure:
Wash your hands thoroughly with soap and warm water. Make sure the area is clean where you are going to perform the procedure. Sterilize the area completely and then put on a mask and gown yourself. Prepare the kit and lay out all your supplies on a clean towel or tray.
- Remove the Old Dressing:
Put on clean gloves and gently peel away the old dressing. Be careful not to put excessive force or move the driveline too much. If you are using any device to protect the component, first remove it. Remove the old dressing by using adhesive remover. You can use any type of adhesive remover according to your facility. Apply first on the edges and remove them. Then continue applying until the complete dressing is removed.
- Wash Your Hands Again:
After removing the dressing, throw away your gloves and wash your hands once again, as it is necessary to perform the procedure in a sterilized environment.
- Setting up the kit:
Open your sterile dressing kit or lay out your items carefully without touching them directly. Make sure that you are wearing your mask and hair cap. After that, put on sterile gloves by using the proper technique instructed by your health care providers.
- Clean the Exit Site:
Sanitize your hands first and check the driveline site properly. Check and report to your doctor if you see any swelling, discharge, or allergy symptoms. By using an anti-bacterial, clean the area around the driveline in a circular motion, moving outward. Avoid going back toward the center. You can use any type of antibacterial provided by your doctor. Treat the driveline area for 60 to 100 seconds and then let it air dry. Do not dry the area by blowing air or using another dry cloth.
- Apply the New Dressing:
Apply liquid adhesive away from the driveline insertion, where the edges of the gauze should be attached. Then cover with a transparent dressing to protect the site while keeping it visible. If you are using a securement device, apply it now to prevent movement.
- Secure the Driveline
Use medical tape or a driveline holder to protect and secure the driveline. This prevents tension and tugging at the exit site.
- Clean Up:
Carefully remove and dispose of your gloves and any used materials. Wash your hands again and clean the area by using alcohol pads or disinfectant.
Possible Complications of Changing LVAD Dressing and How to Avoid Them?
Exit Site Infection: If you notice any redness, swelling, fever, or pain at the driveline site, it can be a sign of infection. Infection can occur due to a poor technique that is not properly sterilized. To avoid this complication, always clean the site first and then properly apply antiseptics. Use sterilized gauze to cover the site and perform dressing changes exactly on the scheduled days.
Bleeding: If you are using poor handling techniques and are not securing all the external components of the LVAD, you may cause bleeding or trauma to the skin. You need to remove old dressings gently without pulling or putting external force on them. If you have sensitive skin, your doctor may advise you to use skin barrier films.
Allergic Reactions: If you see any allergic reaction at the site of the driveline, you should consult with your doctor and follow their instructions. Your doctor will guide you on the handling techniques and using dressing materials that are resistant to allergens.
Pulling the driveline: Pulling the driveline means you are putting force on internal components like the LVAD pump. Before starting the dressing changing procedure, make sure that the controller and batteries are secured in the LVAD apparel. Do not perform sudden movements while changing dressings.
Improper Dressing: Sometimes dressings become loose or too tight due to improper dressing. Perform the procedure by following instructions, and make sure the edges of the dressings are well sealed. Do not use contaminated materials, as they raise the infection risk. Avoid touching the sterile side of the gauze and keep the area dry before applying it.

How I learned to change my LVAD Dressing:
I learned to do my own LVAD dressing changes. I had to do them daily. It gave my caregivers a break and allowed me to travel alone with my LVAD. Independence is a wonderful thing. There were many times that I made mistakes and started over, but it always got done.
Some Tricks for Learning LVAD Dressing Changes:
I stood in front of a big mirror in the bedroom or bathroom, and used the counter or dresser as my sterile area, after wiping it down clean. I got all of my materials out, then mentally double-checked everything before opening the first piece of gauze. Then I followed the routine the hospital taught me. Each hospital is slightly different, so I will leave the details out.
The LVAD clothing, including the LVAD shoulder bag and cotton twill LVAD Vests that we offer on the site, were among the greatest improvements in my life. They completely ended my neck and back pain. You can view these items on the LVAD product pages.
I took a Sharpie and made marks on my cords and battery connectors to line them up when switching from the night machine to batteries. I made it a game to switch without an alarm going off, because my wife was sleeping.
Final Thoughts:
In conclusion, learning how to do your own LVAD dressing changes is essential for maintaining your health and preventing complications. By following this step-by-step guide, you can perform the procedure with strict hygiene protocols. Always make sure that your driveline site remains clean and protected. If you notice any changes or have any concerns, do not forget to consult with your doctor. Life after LVAD can be modified, and you can enjoy a good quality of life while living with it.
Prev post
Learning how to travel with your LVAD
Updated on 16 January 2018
Next post

Beautiful things happen when you distance yourself from negativity
Updated on 28 December 2017